
The practice of potting a bonsai or repotting a bonsai has a major impact on the health of a plant. This is undoubtedly a crucial part of its life cycle.
What happens if you don’t repot bonsai?
The roots of plants grown in pots rapidly fill the pot until they either fail to function adequately or strangle themselves and die.
As the roots of a bonsai become congested, there is no space left in the bonsai soil to retain moisture. This results in a lack of supply of nutrients and water to the plant.
These roots in the pot will also start decaying. Because the roots are relatively short, decay can reach right up to the trunk.
Ultimately, all of the factors listed above result in the death of the bonsai.
Repotting and root pruning your bonsai trees periodically will increase their health and vigor.
Please read how to take care of your bonsai tree for more details.
What to aim for when potting or repotting a Bonsai Tree?
There are a few things you need to aim for at the time of repotting your bonsai tree.

- Depending on the need of your specific bonsai tree, select the right proprietary bonsai soil or make your own bonsai soil mix. Leave a space of about 1/4 inches from the rim of the pot when filling the pot with compost. You can read about the specific needs of all the bonsai trees in our bonsai tree care guide. (list of more than 100 tree species).
- Choose the right pot for the tree, depending on the shape and size of the tree. Read how to choose a pot for your bonsai for more details.
- Selecting the right position of the tree on the pot is equally important (It plays a major role in the aesthetics of the bonsai). Maintain the position of the tree on the central line of the bonsai pot.
- It is very important to cover drainage holes with plastic mesh and provide the bonsai tree with the appropriate support (if necessary).
How to repot a bonsai tree

Step 1 : Choosing a pot for your bonsai
This step is only required if you are using a brand new pot. Skip this if you are going to use the old pot. However, clean the old pot thoroughly.
Choose a container that complements the tree, and soak it for several days in clean water.
After a thorough soak, remove the pot and allow it to dry before using it.
When containers are very dry, they can absorb water from the compost and deprive the plants of moisture.
Do Bonsai trees need bigger pots?
The primary objective of bonsai cultivation is to maintain a growing tree in the same pot indefinitely. Using a very small form factor, the goal is to mimic the natural look of a full tree.
However, there will come a time when the tree will need to be moved into a bigger pot.
(a) If the bonsai is young and fast growing and needs more space for its roots to grow. (b) In case the bonsai owner decides to stop controlling the size of the tree and wants to make the bonsai a bit bigger. (c) Or you simply decided to change the look of your bonsai.
Ultimately, the size of the bonsai tree and the bonsai style determines how big or small the container has to be. With experience you will know the right size of the bonsai pot for your bonsai.
You can read how to choose a bonsai pot for more details.
Step 2 : Removing the bonsai tree from the pot
A few weeks before repotting, it is advisable to keep the tree under cover to ensure the soil is sufficiently dry.
Avoid repotting the tree when the soil is soggy. Removing old soil becomes difficult when the soil is soggy.
What do i need to repot a bonsai tree ?
Keep the repotting tools (such as shears, root rake, knife, root hook etc), water spray bottle, a tub of water (if required) and new bonsai pot ready before you start the repotting process.
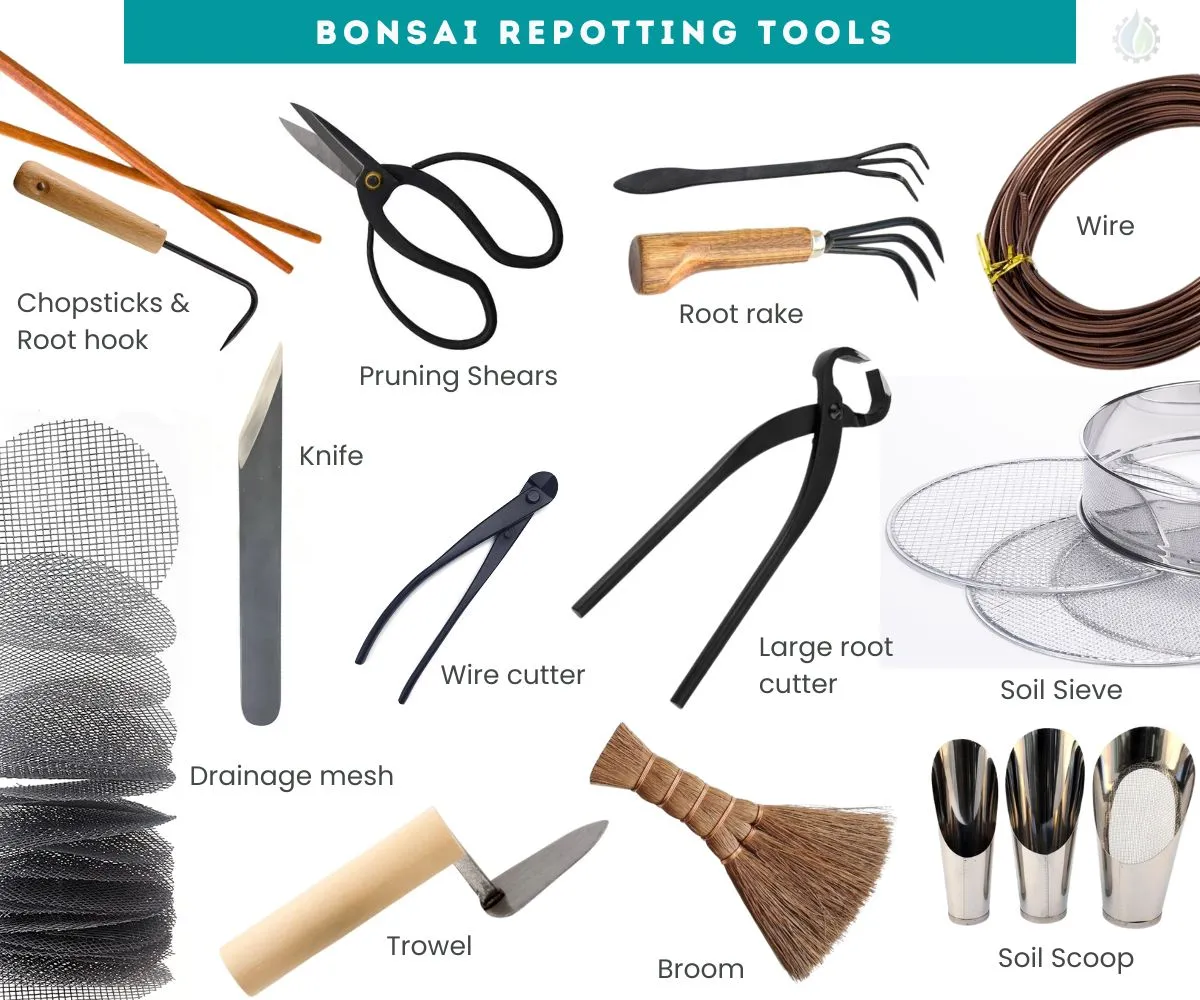
Read Essential and advance bonsai tools for more details.
Remove the anchorage wires. Cut them from underneath the pot.
Remove the tree from its pot gently (early spring is a good time to check). If the roots are pushing against the pot tightly or if the bonsai pot has an inward lip on the rim, then use a transplanting spatula or a knife or a blunt blade to cut around the edge of the root ball.
Also, if the root mass is stubborn, you can try pushing it out with a stick inserted through the drainage holes.
It is important not to pull on the trunk too hard, as this can put a strain on the roots.
After lifting the plant, check the mass of roots coiled around the root ball. If the tree has not been repotted for years, there is also a possibility that you might not see many roots. This means the pot was already pot bound and the roots have now started to decay.
Also, check the soil for insects, especially for root aphids. However, do not confuse mycelium with root aphids.
Mycelium, (which improves pine roots’ growth), is creamy-white in color, while root aphids are bluish-white and may be identified as small, oval, seed-like shapes within their webs.
Read bonsai pests and diseases for more details.
Step 3 : Removing soil from the roots
Use a root hook, knitting needle, chopsticks, a small sharpened wooden dowel or even a pencil to ‘comb’ the soil off the roots.
Start at the edge of the outermost root mass and work your way around, untangling the long roots as you go.
As you are removing soil, always draw the hook outwards parallel to the roots from the center. Do not run the hook across the roots as this can damage the roots.
Any clayey old soil adhering to the roots and especially any material attached to the trunk’s base should be gently removed. It is also important to remove these as they may start rotting if not removed.
As you keep removing the soil, you will notice that the roots are not nearly as dense towards the middle of the bonsai pot.
Make sure to remove the soil underneath base of the trunk. This is very crucial as if not done then with every successive repotting the tree will gradually ‘rise‘ on the pot.
Gently shake the plant to drop any loose dirt particles.
The length of the circling roots can clearly be seen when the root mass is disentangled. This will be helpful at the time of root pruning.
Take your time gently removing the old soil and don’t tear up the roots.
Remove soil and moss from areas close to the trunk with an old toothbrush. Take your time exposing surface roots.
You can remove about half of the soil and leave the rest intact if the roots are healthy. Spray some water on the roots to wash the residue soil on the long roots. This is done to clearly see the roots and to prepare for root trimming.
However, if the soil looks diseased, we will move to step number 4. I also recommend performing step 4 when it is your 2nd or 3rd repotting. Changing all the bonsai soil completely helps you in many ways. The main reasons are:
(a) The trunk gets access to fresh and healthy soil.
(b) It completely eliminates any chances of pest or disease in the soil.
(c) It will give you an opportunity to examine the whole root system for more detailed and accurate root pruning.
Step 4 : Washing the roots in case removing all the soil
This step should only be performed in case you plan to remove all the soil (if you are not happy with the health of the roots or if the tree is being repotted for second or third time).
You can submerge the root mass in water for some time (15-20 minutes is good). This will help in softening the soil around the roots.
The soil can now be washed using a hose or by keeping the roots below a running faucet.
Step 5 : Root pruning of bonsai
When pruning, you should always use sharp tools. This will ensure that the roots have a clean cut and are not squashed.
Also, washing the loose soil will help the tools to retain their sharpness or else the grit will dull the edge of the tools.
Is root pruning safe?
Yes. Root pruning is absolutely safe. In fact it is a great way of keeping the bonsai healthy. However, you must know how your bonsai tree species reacts to it. As an example, rosemary bonsai trees or Queensland Bottle tree bonsai can tolerate heavy root pruning as the roots grow very rapidly. On the other hand, Lady palm tree Bonsai (which do not prefer their roots being disturbed) or Australian umbrella tree Bonsai (which have delicate and fleshy roots) cannot handle heavy root pruning. Special care should be taken while trying to work with their roots.
Read more about the root pruning requirements of a specific tree in out bonsai tree care guide.
Should I trim the roots of my bonsai tree? or Is root pruning necessary?
It depends on the size of the bonsai tree you are aiming for. Root pruning is not just done for the removal of dead and decaying roots and the growth of new healthy roots, but also to control or restrict the size of the bonsai. If you are not planning to increase the size of your bonsai, you should definitely perform root pruning.
However, if you are planning to increase the size of the bonsai, then move the bonsai to a bigger pot and let the roots grow even more.
How much roots are trimmed in bonsai?
The length of the roots to be trimmed depends on the variety and health of the bonsai tree. However, as a general rule of thumb, do not remove more than 1/3rd of the total root mass of a healthy bonsai tree. Certainly no more than a half.
As you gain experience, you will be able to learn whether or not your tree is tolerant of root removal so that you can remove more mass.
How do you prune bonsai tree roots?
Bonsai produce masses of fine feeding roots under healthy conditions. First thing to do is to cut back the thinner roots (using sharp pruning shears) by holding the tree up and allowing them to hang down.
Masses of these thin roots can be trimmed to a shape that fits comfortably in the pot. Leave a space of about 1/2 – 3/4 inches all round the edges and underneath.
Keep spraying these fine bonsai roots with water as they tend to dry out fast. However, avoid excessive wetting of the attached soil as much as possible.
If the fine roots are not abundant, prune about a third and fold the rest underneath when placing the tree in the pot.
For trees with small root balls, trim the roots only slightly at the edges. Soon new branches of roots will emerge from the pruning cuts.
It is important to remove any dead or decaying roots by pruning them back to the healthy part of the root.
Ensure that all the thick woody roots growing to the edge of the pot are pruned back. Prune 1/3rd of the total length of the root. In this process, the fine feeding roots attached to the thick roots will get removed. But these will grow back from around the pruning cuts. Try and keep as many fine feeder roots as possible.
In most cases, you can remove woody structural roots that do not contain root hairs with very little damage to the bonsai. Generally, woody roots are mainly there to support the bonsai tree and are not directly involved in the absorption of moisture or nutrients by the tree.
Occasionally, you will notice a root that is unsightly and unnecessary, and this should be removed, provided that the tree is supported by sufficient roots nearby.
Use big root pruners in case the roots are very thick. These large root wounds should be sealed with wound sealant to prevent root rot.
You will need to cut wedge-shaped pieces of the root ball after you have trimmed the long roots of the tree. This will help you in 2 ways:
(a) Encourage the tree to grow more fibrous roots close to the trunk of the tree.
(b) As a result, new soil is introduced into the very core of the root ball. This contributes to maintaining a healthy bonsai by preventing the old soil and root mass from becoming compacted.
How do I thicken my bonsai root?
To increase the thickness of the roots of your bonsai you will have to let the roots grow in a bigger pot (avoid root pruning) and apply a feed high in potassium (a complete fertilizer should be fine). Potassium will promote thicker cell walls and root growth.
A bonsai’s thick roots prevent it from succumbing to environmental stresses (e.g. drought). It helps the bonsai absorb more nutrients from the soil. Not only that, thick surface roots can also add a lot to the overall aesthetics of the bonsai tree.
Step 6 : Drainage mesh and making wire retainers for the mesh
Cut a piece of plastic mesh that fits over the drainage hole in the pot.
Bend the ends of a piece of wire (you can use wires covered with plastic also) . Make the bends at a right angle forming 2 small loops.
Put the mesh over the hole and bend back the ends of the wire after inserting the ends through the mesh. This will prevent slipping of the plastic mesh.
The drainage mesh prevents the new soil from spilling out and also protects the bonsai soil from unwanted pest to enter through the drainage holes.
Step 7 : Putting an anchorage wire in the bonsai pot
The anchorage wire should be inserted into the pot. This is especially critical if you are using a shallow pot which won’t be able to provide the necessary support for the bonsai tree.
It should be long enough to reach from the holes all the way around the root ball and around the trunk.
You will need to push it down through one of the drainage hole, pass it under the pot, and pass it up through the second hole on the opposite side.
The long ends of the anchorage wire should be bent over the pot rim.
It works best with containers that have legs or raised areas at the bottom. Containers with flat bottoms will wobble.
Some pots even come with special holes just for anchorage wires. When available, use them instead of drainage holes.
If you are using a pot with just one drainage hole, pass the wire through the hole, around a non-ferrous headless nail or a piece of small stick, and back through the hole.
It should be noted that this process is not usually necessary for indoor bonsai trees potted in deep pots. Because they will not be placed outside after repotting and won’t be exposed to harsh weather conditions and wind.
Step 8 : Filling the pot with new soil for repotting bonsai
If you are using a deep container, you can spread a 2cm thick layer of clean grit or gravel or pebbles at the base. This will protect the root ball from sitting in wet soil.
However, this drainage layer is not necessary if you are using a shallow or small pots.
Moreover, the use of a drainage layer is not necessary if your soil is sufficiently free-draining.
After this, add a layer of dry bonsai soil. The amount of bonsai soil depends on the depth of the bonsai container. The type of bonsai soil used depends on the type of bonsai tree being grown.
You can use proprietary bonsai soil or you can even make your own bonsai soil. Make your own bonsai soil with these bonsai soil recipes. (eg. a mix of small bark chips and lava rock)
Decide where your bonsai trunk is going to sit in the pot. (Tip: trunk slightly off-center looks better)
Then, make a small mound where the trunk will sit. However, don’t make the mound so big that the trunk of the tree is raised above the rim of the pot. Or else watering the bonsai will be difficult.
More soil will be added in step 10.
Step 9 : Bonsai tree placement on the pot
Place the tree in the pot and gently twist it back and forth to settle it. Apply gentle downward force. Avoid jabbing motion.
Under the trunk, the mound of soil created will spread and work its way between the roots.
Spread the roots evenly in all directions in order to improve its appearance.
Make sure that you have chosen the front of the tree and positioned it accordingly.
Once satisfied with the positioning, you can move on to securing the tree.
Step 10 : Securing the tree to the bonsai pot and adding more soil
Bring the two ends of the anchorage wires over the root mass. Twist them together until the tree is firmly secured in the soil and does not rock. Don’t twist the wires too tight.
Ensure that any surface roots are protected with rubber or plastic padding before the wire is tied to the tree.
You may use a wire clip to hold any roots that are unusually bent.
When the tree is moved or exposed to strong winds, delicate new roots will not be damaged because of the anchorage wires.
The twisted ends of these wires can be cut off in a few months (when the roots of the tree have anchored the tree in the container), so leave them in a place where you will be able to access them. (This usually takes about four to six weeks)
You can add more soil to the area around the trunk of the tree and work it around using a chopstick, a sliver of wood or a pencil. But do not stab the soil.
Use the stick to work the soil between and under the bonsai roots. Press the soil gently with your finger to settle it.
You can also use your fist or a rubber hammer to tap the pot and settle the soil around the roots.
Fill the soil up to just below the rim. After a period of few weeks, the soil will settle even more and the level of the soil surface will go down. You can top up the soil at this stage.
A top-dress of Japanese akadama clay can also be applied. It is both attractive and a good moisture indicator. When the soil is dry, it will change to a much lighter color.
Step 11 : Finalizing the repotting of a bonsai tree
We are finally done will all the major bonsai repotting steps.
With a brush, smooth off and tidy the soil surface once the soil has been worked into the roots.
Arrange the soil a little bit higher around the base of the trunk.
Do you water bonsai after repotting?
Yes, to ensure that all the fresh dry soil is thoroughly moistened, a good soak is crucial after repotting. Water the tree thoroughly after the soil has been worked into bonsai roots.
The tree should be watered with a watering can fitted with a fine rose-head attachment. This will make sure that no soil is washed away by water pressure.
Or you can use a spray bottle to first wet the top soil surface and then use a watering can to water the bonsai.
You can even submerge the pot up to half its depth in water for about 30 minutes or until the root ball is adequately saturated.
The next watering session should be performed when the soil looks dry. And water sparingly until new growth is established. Read watering a bonsai tree for more details.
Remember that recently repotted roots are prone to fungal infection and root rot if they get too much moisture. Read pest and disease control in bonsai for more details.
Do you fertilize bonsai after repotting?
No. Freshly potted trees should not be fertilized for six to eight weeks since their roots are particularly prone to chemical scorching and cant handle too much stress.
However, you can add some vitamin B1 compound when the first watering a repotted bonsai tree is done.
You can also add sequestered iron. Ericaceous plants such as Azaleas and rhododendrons will certainly benefit from this.
Read more about bonsai fertilizers : how to use bonsai fertilizer
Bonsai repotting aftercare
- Until new growth begins, keep the tree in a sheltered position protected from cold draughts and frost, direct sunlight, rain and wind.
- Firm the soil with a trowel to firm up the soil after watering.
- You should check the soil often to make sure it has not become dry.
- At this stage you can add more decorative gravels or lay moist moss over the soil surface.
- Move the tree gradually back to its normal growing spot over the next few weeks (almost 2 weeks).
- You can consider pruning or wiring the tree once it has grown five leaves or more on its branches.
- Check the stability of the tree after four to six weeks by loosening the anchoring wire and wiggling the trunk. Trees will be secure in containers if their roots have grown properly. Cut the twisted wire on the top and gently pull the wire from the bottom of the pot.