
Table of Contents
Overview of mushrooms and global trend
*Some of the sections in this article are too long. Kindly use the table of content on the top of the article to jump to the section of your interest.
Mushroom farming/cultivation started as a hobby, however it’s a full-fledged, highly profitable profession/agribusiness. Most varieties of mushrooms can be farmed/cultivated in rooms, sheds, garages, basements and small warehouses.
Commercial mushroom farming was introduced in India in late 1960’s, when a German agriculturalist collaborated with Indian agriculturist in Solan, a town in the Indian state of Himachal Pradesh, under a scheme called “Development of mushroom cultivation in Himachal Pradesh”.
This article will be focused on giving you information on mushroom types, global and local mushroom market, global and local mushroom production along with production share, techniques of mushroom farming in India, some of the diseases associated with cultivated/farmed mushrooms and varieties of mushrooms that can be farmed locally for commercial purposes. Kindly refer to the table of content section to jump straight to the topic of your interest.
Entrepreneurs have taken up mushroom farming in a big way. The message has reached people that mushrooms have a national and international market.
World mushroom consumption compared to India
Mushroom consumption in India is very low as compared to a lot of mushroom consuming countries.

Since, the trend of mushroom consumption has seen very slow rate of growth in India, farming of mushroom has not caught up with the global trend.
Currently, mushroom consumption in India is estimated to be around30-40 g compared to 2-3 kg in the United States and Europe. India consumes about 90 grams of mushrooms per person, a relatively low quantity compared to other countries, including the U.S. with 1.49 kilograms and China with 1.16 kilograms.
Global Mushroom production and market share
Mushroom market had a global value of $35 billion in 2015. In the period between 2016 and 2021, the market is projected to grow by 9.2 percent. As a result,by 2021, the market is expected to reach nearly $60 billion. Leading mushroom producers include China, the United States, the Netherlands, Poland, Spain, France, Italy, Ireland, Canada and the United Kingdom.
| Country | 2010 | 2011 | 2012 | 2013 | 2014 | 2015 | 2016 |
|---|---|---|---|---|---|---|---|
| China | 48,26,000 | 56,58,972 | 65,27,965 | 70,68,102 | 75,91,140 | 80,26,152 | 77,86,368 |
| Italy | 6,84,401 | 7,61,858 | 10,16,886 | 6,04,525 | 6,00,114 | 5,94,835 | 6,83,620 |
| USA | 3,59,469 | 3,90,902 | 4,02,904 | 4,08,157 | 4,32,100 | 4,29,562 | 4,19,630 |
| Netherlands | 2,66,000 | 3,04,000 | 3,07,000 | 3,23,000 | 3,10,000 | 3,10,000 | 3,00,000 |
| Poland | 2,30,000 | 2,20,000 | 2,28,300 | 2,37,069 | 2,45,747 | 2,52,944 | 2,60,140 |
| Spain | 1,33,000 | 1,46,100 | 1,47,440 | 1,49,700 | 1,49,854 | 2,18,795 | 1,97,010 |
| Canada | 78,452 | 84,202 | 1,37,597 | 1,32,448 | 1,34,545 | 1,18,642 | 1,33,935 |
| France | 1,19,373 | 1,15,696 | 1,16,602 | 1,04,461 | 1,08,671 | 1,01,135 | 1,01,949 |
| United Kingdom | 69,300 | 70,740 | 78,580 | 85,484 | 94,857 | 1,03,197 | 99,813 |
| Ireland | 54,500 | 57,700 | 69,600 | 67,700 | 69,600 | 72,200 | 70,000 |
| India | 40,600 | 40,600 | 30,000 | 17,000 | 28,000 | 33,699 | 29,992 |
| Republic of Korea | 26,250 | 24,787 | 26,000 | 26,771 | 26,860 | 26,292 | 26,158 |
| All other | 53,69,166 | 62,27,659 | 70,94,714 | 76,65,730 | 82,16,306 | 86,59,997 | 84,80,171 |
| Total production | 1,22,56,511 | 1,41,03,216 | 1,61,83,588 | 1,68,90,147 | 1,80,07,794 | 1,89,47,450 | 1,85,88,786 |
Among the key mushroom products are shiitake, button, oyster, and other products containing paddy mushroom, milky mushroom, reishi mushroom, and winter mushrooms, Morchella species and Tuber magatum.

Even though, the Asian countries are expected to grow the most in terms of production of mushrooms, India is still growing in mushroom farming business at a rather slow rate of 4.3% per year.
There are 105.4 tons of white button mushrooms being exported by India in canned and frozen form. Among the world’s mushroom production, India’s button mushrooms production contribute 15%.
A total of approximately 0.13 million tonnes of mushrooms were produced by mushroom farming in India between 2010 and 2017. Even though, this number looks big, but it looks insignificant when compared to other mushroom producing countries.
Since the cost of farming mushrooms is going high in the west, this is a perfect opportunity for Indian Farmers and entrepreneurs to start thinking seriously about mushroom farming in India.
The cost of producing mushrooms in the West is rising because of high labour costs. Europeans and Americans are increasingly looking to China and India for their mushrooms.
Mushroom farming in India : Production and trend
Agaricus bisporus (white button mushroom), Pleurotus spp. (oyster mushroom), Volvariella volvacea (paddystraw mushroom), and Calocybe indica – milky mushroom comprise the major mushroom varieties grown in India.
Pleurotus sajor-caju, Pleurotus flordia, Pleurotus flabellatus, Pleurotus eous, and Pleurotus florida are the most widely grown Pleurotus species.
In tropical and subtropical regions, oysters, paddy straw, and milky mushrooms are grown on a seasonal basis.
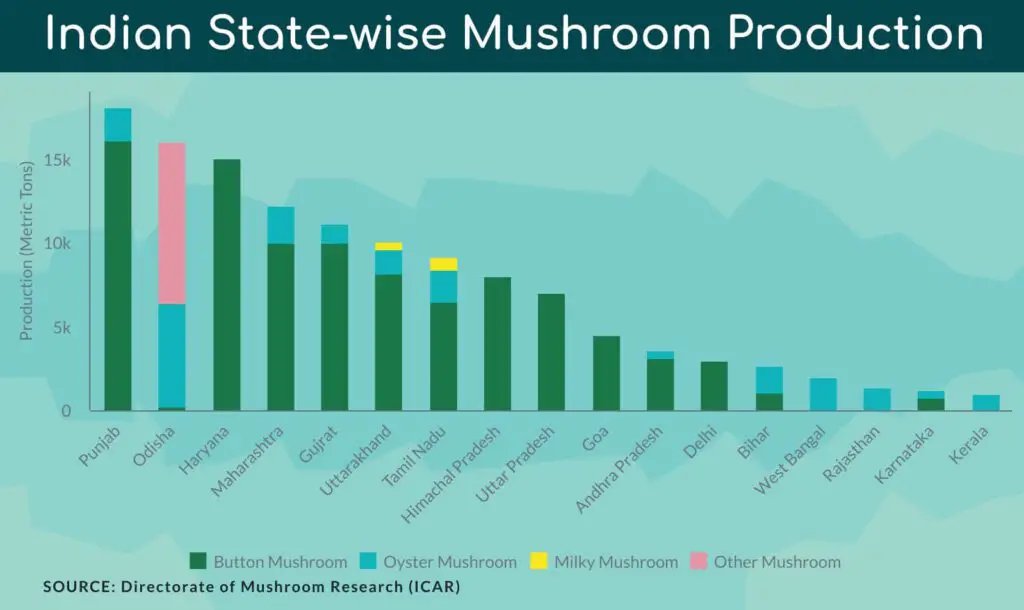
There are approximately 73% of button mushrooms produced in India and the production systems are both seasonal farming as well as high-tech.
Oyster mushroom production accounts for 16% of total production of mushrooms and 10,000 tons annually in India is produced. Orissa, Karnataka, Maharashtra, Andhra Pradesh, Madhya Pradesh, West Bengal, as well as Meghalaya, Tripura, Manipur, Mizoram, and Assam grow oyster mushrooms in large quantities.
The first indigenous mushroom to be commercialized in India is the Calocybe indiaca (Milky mushroom).
Traditionally, the Shiitake mushroom has been grown in India on wood logs, artificial media, corn cobs, sawdust, wheat bran, and other additives. Shiitake mushroom cultivation is negligible and barely successful in India due to non-standardized cultivation methods.
Nutrient content of mushrooms
Mushrooms are an excellent source of soluble protein and fiber, which play an important role in human health.
As a relatively easy-to-digest protein (70-90%), mushroom protein is regarded as superior to vegetable protein.
Following table shows the nutrient content of per 100 gram of mushroom.
| MUSHROOM SPECIES | PROTEIN | FAT | CARBOHYDRATE | FIBRE | ASH | ENERGY KCAL |
|---|---|---|---|---|---|---|
| Auricularia Auricula | 4.20 | 8.30 | 82.80 | 19.80 | 4.70 | 351.00 |
| Agaricus Bisporus | 33.48 | 3.10 | 46.17 | 20.90 | 5.70 | 499.00 |
| Calocybe Indica | 17.69 | 4.10 | 64.26 | 3.40 | 7.43 | 391.00 |
| Flammulina Velutipes | 17.60 | 1.90 | 73.10 | 3.70 | 7.40 | 378.00 |
| Lentinula Edodes | 32.93 | 3.73 | 47.60 | 28.80 | 5.20 | 387.00 |
| Pleurotus Sajor-caju | 19.23 | 2.70 | 63.40 | 48.60 | 6.32 | 412.00 |
| Pleurotus Ostreatus | 30.40 | 2.20 | 57.60 | 8.70 | 9.80 | 265.00 |
| Volvariella Volvacea | 37.50 | 2.60 | 54.80 | 5.50 | 1.10 | 305.00 |
In India, there are several medicinal mushrooms, including Ganoderma lucidum, Phellinus rimosus, and Pleurotus spp., which possess profound medicinal properties.
Six steps of mushroom farming
Following section of the article will describe the steps These steps are basically divided into mainly two phases. These steps include the farming process beginning right from making the compost for mushrooms to cropping of mushrooms.
Phase I
Step 1. Preparing the compost
- Primarily, compost preparation is done outdoors. However, it can also be done in an enclosure with a shed.
- A wharf, a structure made of concrete is used to make the compost.
- Piles of compost material can be mixed manually or can be done with the help of a compost turner.
- There are two types of composts: Natural compost (primary ingredient is horse manure) and synthetic compost (hay, crushed corncob, hardwood bark, cottonseed hulls, cocoa bean hulls, Banana pseudo stem, Cotton mill waste, Water hyacinth, neutralized grape pomace, old shredded newspaper, urea, calcium, etc.)
- Both types of compost will need additional supplementation of nitrogen and gypsum.
- As the compost is turned, it is wetted (water sprayed) for adequate mixing of the compost. Nitrogen supplement and gypsum are also added in this step.
- The byproduct of this process is heat, carbon dioxide and ammonia. Most appropriate food source is created for mushrooms in the compost by heat releasing chemical reactions and microorganisms in the compost.
- Adequate amount of moisture, oxygen, nitrogen and carbohydrates must be present throughout the process or else the composting will stop.
- Addition of gypsum brings many advantages. Gypsum helps the chemicals added to the compost to flocculate on the straws or hay. It also reduces the greasiness of the compost. It helps in aeration of the compost, which in turn minimizes the risk of development of chemicals which will hinder the good growth of mushrooms in the compost.
- 20kg of gypsum per metric ton is recommended to be added in the compost.
- Nitrogen supplement is added to the compost to increase the nitrogen content of the natural compost to 1.5 percent or synthetic compost to 1.7 percent.
- Nitrogen supplements such as seed meals of soyabean, cotton or peanut and chicken manure can be used.
- Synthetic compost will require addition of ammonium nitrate or urea also.
- The pile height shall be 5 to 6 feet on the concrete slab. A raised concrete slab is advisable to avoid any water retention by providing good drainage. Keep the pile rigid and dense from the sides but loose from the center for good aeration.
- The optimal temperature of compost is 60 to 80 degrees Celsius. The intervals between the number of turning of compost depends on the temperature and the condition of the compost material.
- The balance of water addition to compost should be maintained at all the times. Less water will result in cessation of food creation for mushrooms and excess water will lead to stopping of aeration. A good balance of microbial activity, nutritive value, water, and temperature are all necessary and imbalance of even one component can ruin the quality of the compost.
- The composting will take one to two weeks, depending on the condition of the compost material and turning.
- The desirable compost should have soft, pliable straws; a strong smell of ammonia; temperature of almost 75 degrees Celsius or above; chocolate brown in color; and moisture content of 68 to 74 percent.
Phase II
Step 2. Setting the compost
- This step is for pasteurization of the compost to eliminate insects, pest fungi and nematodes. It’s also necessary to remove ammonia. The percentage of ammonia should be less than 0.07.
- There are three types of methods used for this step. Compost is placed in rooms with controlled optimum environment.
- Wooden tray method: Compost is packed in wooden trays and stacked on top of each other.
- Bed system method: Compost is spread over beds in the controlled environment rooms.
- Bulk system method: The compost is piled on perforated cement block bins.
- De-ammonifying organisms under suitable conditions will use carbohydrates and nitrogen and hence remove excess ammonia from the compost.
- Generally, two types of controlled environments are used for this step:
- Low temperature environment: The temperature of the compost is raised to 52 degrees Celsius. After that the temperature is lowered by approximately 1 degree Celsius until the smell of ammonia is completely gone.
- High temperature environment: The temperature of the compost is raised to 63 degrees Celsius for about 6 to 8 hours. This can be done by injecting steam in the compost. And then the temperature is reduced to 60 degrees Celsius. Thereafter, the compost is left to cool down naturally by a temperature of 1 to 2 degrees everyday till the content of ammonia is lowered to desirable levels.
- The optimal temperature of compost is 24 to 27 degrees Celsius. The moisture should be between 68 to 72 percent and the nitrogen content should be 2 to 2.4 percent. 2.5 to 3.2 kg of compost per square foot of the tray is advisable for maxing the mushroom production/yield.
Step 3. Spawning/Sowing the mushroom mycelium
- In nature, mushrooms are propagated by microscopic spores from below the mushroom cap. But these spores cannot be handled like seeds for sowing in the compost.
- Hence, Mushrooms are planted using mycelium, a thin thread like cell of a mushroom.
- Mycelium propagated vegetatively is known as spawn.
- Traditionally spawns were mixed with the compost by hand.
- In modern tray system, spawn is mixed in the compost as trays move through the conveyor belt.
- In the bed system, spawn is mixed with compost with spawning machines which have small finger like textures.
- A temperature of 24 degree Celsius is maintained in the controlled environment. The mycelium from the spawns will combine together and produce a white mass on the compost. Maintaining a consistent temperature is very important as high temperature will kill the mycelium and low temperature will slow down the growth of the mycelium.
Step 4: Casing
- A top-dressing soil is applied to the compost for the formation of mushrooms. This step is called casing.
- A mixture of limestone and peat moss, reclaimed compost, cow dung with garden soil, or clay-loam soil are a good option for casing on the compost.
- When mycelium fuses together, it forms a thick string like structure called rhizomorphs. These rhizomorphs grow to become mushrooms.
- Casing should always be pasteurized before application to kill any insect or pathogen.
- Casing shall be applied uniformly on the compost with proper depth. So that the spawns can penetrate and grow beyond the casing into healthy mushrooms.
- The compost should be placed in a controlled environment with good humidity and temperature set at 24 degrees Celsius.
- The temperature of compost should be reduced every day by approximately 1 degree Celsius till the time small mushrooms are seen sprouting from the compost.
- The water application after casing is a fine art which a grower will learn after gaining experience.
Step 5: Pinning
- After casing, an outgrowth from the rhizomorphs can be seen evenly all across the compost bed. These outgrowths are called “initial”.
- When the “initial” grows to a larger size (approximately 4 times the size of an “initial”), it’s called a “Pin”.
- In almost 3 weeks, these pins will grow into harvestable mushroom.
- Make sure that the carbon dioxide level in the air is 0.08 percent or lower.
- The lowering of carbon dioxide level is done by introducing fresh air in the system.
- The best time to introduce fresh air can be the time when mycelium can be seen emerging from the casing surface.
- Early reduction in carbon dioxide may result in slow growth of mycelium. The mushrooms might start growing from below the surface of the casing, which will result in dirty mushrooms.
- Pinning step is very important as it dictates the yield and the quality of the mushrooms.
Step 6: Cropping
- Harvesting of the mushroom depends on the quality and the stage of growth of the mushroom.
- For example, in some parts of the world such as North America, customers prefer a mushroom with a tight closed veil. Whereas, in some parts of the world such as Europe, customers prefer mushrooms with larger elongated veils.
- Mushroom harvesting comprises of cropping/harvesting cycles typically expanding in 3–5-day cycle. These cropping cycles are known as bloom, flush or break.
- Different farmers follow differing cropping patterns depending on the market and customer demands. Some farmers may harvest mushrooms as early as 30 days and on the other hand, some farmers might stretch the harvest time to 150 days.
- Depending on the mushroom species, the plucking of the mushroom for harvesting might differ.
*A Must read : 8 types of soils of India and soil distribution in India
Guide to different mushroom farming in India
Now that we have discussed the general thumb rules of farming of mushrooms, let us have a look at the farming techniques and recommendations for different mushroom farming in India.
Let’s get the basics and the common procedures out of the way before we get ourselves introduced to farming of different mushrooms.
First and the second step of mushroom farming i.e., composting and finishing of composting are pretty much the same for all mushrooms such as button, milky, paddy straw, oyster, Reishi and Shiitake.
As discussed earlier in the article (in six steps for mushroom farming) there are two types of composts: Synthetic compost and Natural compost.
Synthetic compost for mushroom cultivation
- As the name suggests, it derives the nutrients from synthetically made components such as urea, gypsum and calcium ammonium nitrate or ammonium sulphate.
- The hey straw is cut in the length of 8 to 20 cm long and is spread evenly over a compositing bed and watered uniformly by water.
- Let’s assume the tray size of 1meter x 0.5meter x 0.15meter for cultivation of mushrooms. Also, let’s assume we are going to use 15 such trays for mushroom farming. Ingredients required:
| INGREDIENTS REQUIRED | QUANTITY REQUIRED |
|---|---|
| Wheat Straw | 250 KG |
| Urea | 3 KG |
| Gypsum | 20 KG |
| Rice/Wheat Bran | 20 KG |
| Ammonium Sulphate/Calcium Ammonium Nitrate | 3 KG |
*A Must read : Complete guide to Types of Fertilizers : Their Classification and Use
- A pile is made by mixing all the ingredients except for gypsum.
- The pile height can vary from 1 meter to 2 meters. Let’s assume a pile height of 1 meter with a width of 1 meter.
- The pile should have a firm and dense outside but a soft middle so that aeration can take place properly.
- As mentioned earlier, the process of opening and mixing the compost again is called “turning”. The number of turning depends on condition of ingredients and climate. Different farmers have different regimes for turning.
- Turning can be done on:
| DAY | TURNING MANAGEMENT |
|---|---|
| 1st Day | Turning with no supplementation to the compost |
| 4th Day | Turning with no supplementation to the compost |
| 8th Day | Turning with no supplementation to the compost |
| 12th Day | Turning along with adding 10 Kg of Gypsum |
| 16th Day | Turning along with adding another 10 Kg of Gypsum |
| 20th Day | Turning and also adding 10 ml of (Malathion, DOT, Lindane, BHC) in 5 liters water |
- Chicken manure has higher nutrient contents like nitrogen (4.55 to 5.46 %), phosphorus (2.46 to 2.82 %), potassium (2.02 to 2.32 %), calcium (4.52 to 8.15 %), magnesium (0.52 to 0.73 %). You can also add 60 KG of chicken manure to the compost if possible.
Natural Compost for mushroom cultivation
- As the name suggests, this compost is made by using natural ingredients.
- Again, let’s assume the tray size of 1meter x 0.5meter x 0.15meter for cultivation of mushrooms. Also, let’s assume we are going to use 15 such trays for mushroom farming. Ingredients required:
| INGREDIENTS REQUIRED | QUANTITY REQUIRED |
|---|---|
| Poultry Manure | 100 KG |
| Wheat Straw | 350 KG |
| Horse Dung | 1000 KG |
| Gypsum | 25 KG |
- The ingredients are mixed and wetted with water on the composting yard.
- A pile of compost is made and observed till it starts emitting odor of ammonia.
- The pile of compost is turned every 4 days and in 3rd and 4th turning 25kg of gypsum is added per ton of compost.
- In the last turn you can add 10 ml of Malathion, DOT, Lindane or BHC in 5 liters of water to the compost.
* A Must Read : Complete guide to Types of Fertilizers : Their Classification and Use
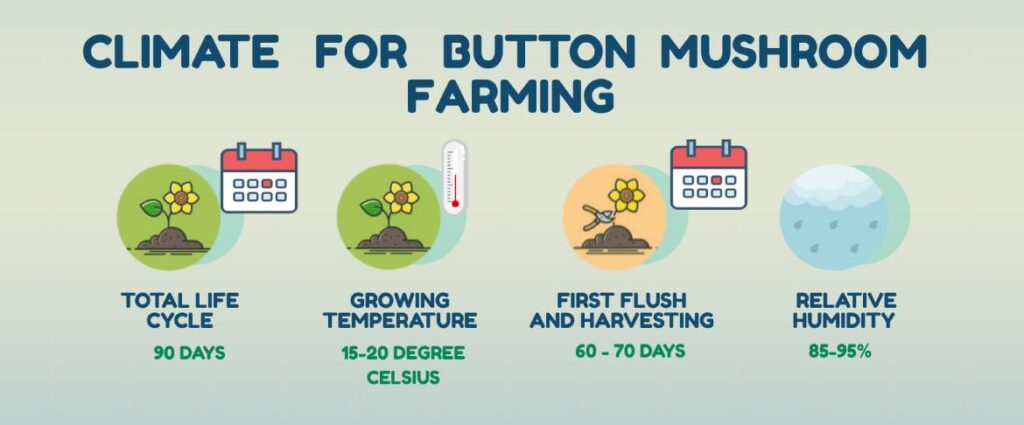
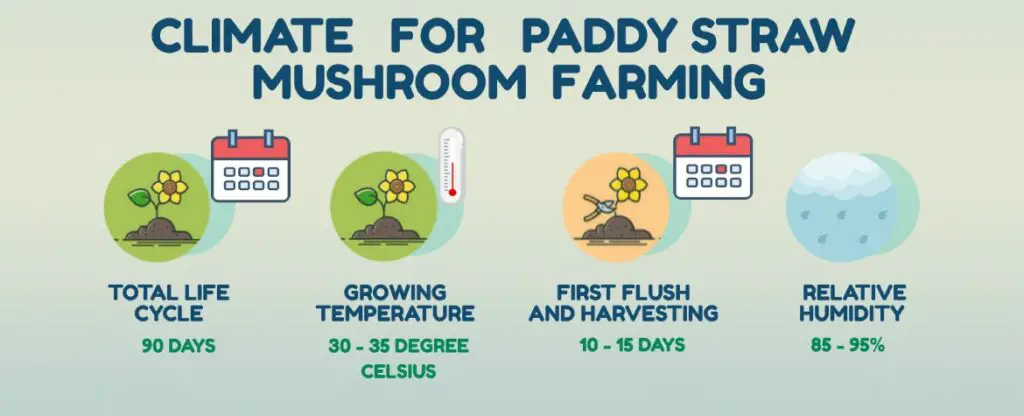
Climatic conditions for mushroom farming in India
Following table lists the climatic conditons, storage conditions, first flush details, yeild and approximate costing of button mushroom, oyster mushroom, pady straw muashroom and milky mushrooms farming in India.
| CHARECTERESTICS | BUTTON MUSHROOM | OYSTER MUSHROOM | PADDY STRAW MUSHROOM | MILKY MUSHROOM |
|---|---|---|---|---|
| SPECIES | Agaricus Spp | Pleurotus Spp | Volveriella Spp | Calocybe Indica |
| SUBSTRATE | Compost | Paddy Straw | Paddy Straw | Paddy Straw |
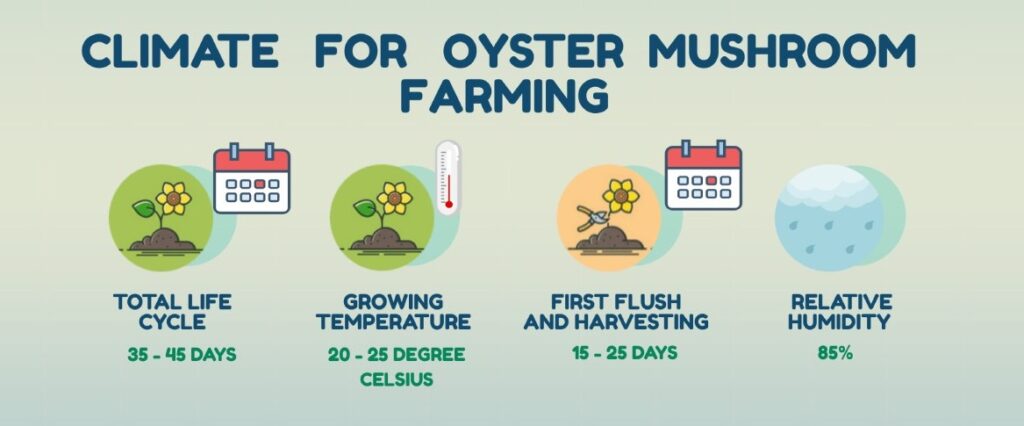
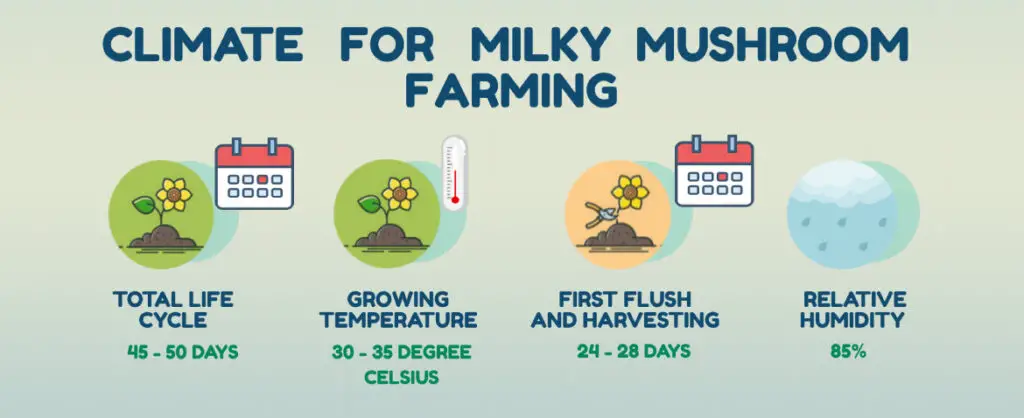
| GROWING TEMPERATURE | 15-20°C | 20-25°C | 30-35°C | 30-35°C |
| RLATIVE HUMIDITY | 85-95% | 85% | 85-95% | 85% |
| TOTAL LIFE CYCLE | 90 Days | 35-45 Days | 90 Days | 45 - 50 Days |
| FIRST FLUSH AND HARVEST | 60 -70 Days | 15 - 25 Days | 10 - 15 Days | 24 - 28 Days |
| YEILD | 800-900 grams / Bed (4 Kilo Grams Compost) | 635 grams (500 grams Paddy Straw) | 800-900 grams / Bed (4 Kilo Grams Compost) | 700 grams (500 grams Paddy Straw) |
| SHELF LIFE (ROOM TEMP.) | 2 Days | 2 Days | 1 Day | 3 Days |
| SHELF LIFE (REFRIGERATED) | 3 Days | 3 Days | 2 Days | 5 - 7 Days |
| PROTEIN | 23.90% | 23.60% | 23.90% | 32% |
| PRODUCTION COST | 120* INR | 80* INR | 60* INR | 70* INR |
*The prices mentioned in the table might vary from state to state.
Guide to button mushroom farming in India
After phase I and phase II of compost making and pasteurization of compost, we can start with spawning and cultivating the mushrooms.
Traying the compost for button mushroom
- The size of the tray assumed in this guide is 1meter x 0.5meter x 0.15meter.
- Compost is filled in the tray with the depth of 15-18 cm.
- The compost should be compressed gently at the surface only.
- Make sure there is sufficient spacing between the trays when they are stacked over each other. A spacing of 15 cm is advisable.
Spawning of button mushrooms
- Mixing spawns with the compost is called spawning.
- There are various spawning techniques used:
- Spot spawning: 5 cm deep hole is made in the compost and lumps of spawns are placed in the hole. The spacing of spawns is 20-25 cm. the holes are later covered with compost.
- Surface spawning: the spawns are evenly layered across the compost and mixed at a depth of 3-5 cm. later the top is covered with a thin layer of compost.
- Layer spawning: 3 to 4 layers of spawn are mixed with compost, and later covered with a thin layer of compost.
- The spawn is mixed with the compost at a rate of 7.5 ml/kg or 500-700 grams / 100 kg compost.
- 500 grams of spawn is enough for 5 standard trays.
- The trays are stacked after spawning.
- There must be a spacing of 1 meter from the ceiling and the topmost tray.
Spawn running of button mushrooms
- The spawned compost is now covered with newspaper or plastic sheets.
- The fungal thread will take 12 – 14 days to colonize the entire compost.
- The temperature maintained in the cropping room is 24±2 degrees Celsius.
- Relative humidity should be around 90%. The floor and the walls of the room can be watered to raise humidity if needed.
- Higher carbon dioxide concentration in the air added benefits in this stage of mushroom farming.
Casing of button mushrooms
- After spawn run completion, the compost bed should be covered by casing of about 3-4 cm thick.
- The casing should be porous, should be able to hold water and should have a pH level of 7 – 7.5.
- Peat moss is considered as best casing material.
- Mixture of garden loam soil and sand (4:1), spent compost (2–3-year-old), cow dung and loam soil (1:1); burnt rice husk, sand and lime are commonly used casing materials.
- The casing has to be posturized before application. For pasteurization you can steam the soil or use formaldehyde (2%) and bavistin (75 ppm).
- Casing pasteurization should be done at least 10 days before its use in the compost.
- After application of casing the temperature is maintained for 24±2 degrees Celsius and relative humidity of 85-90% is maintained.
Fruiting of button mushroom
- The temperature is slowly reduced every day by almost 1 degree Celsius until it reaches 18 degrees Celsius.
- The cabon dioxide level in the air is lowered to 0.08-0.15% by ventilating the room.
- The “initials” will start merging to form pinheads, eventually moving into button forming stage.
Harvesting of button mushroom
- First flush, bloom or break appears after almost 3 weeks of casing or 5 to 6 weeks of spawning.
- It is very important to layer the casing properly as if it too thick, the musrooms will come out as dirty.
- Harvesting is done in button stage when the caps/veils measure 2.5 to 4 cm.
- The mushrooms should be harvested by lightly twisting the stem without disturbing the casing soil.
- The gaps after harvesting should be again filled with casing soil and watered.
Yield of button mushroom
- Per tray you can expect 3 to 6 kg of mushrooms depending on the precise care and maintenance given in every individual stage of mushroom farming
- 18-20 kg per 100 kg of compost is a desirable crop yield of 2 months old culture.
Storage of button mushrooms
- Long term storage:
Canning is the most preferred storage technique. This makes it easy for export.
Apart from canning, freeze drying, pickling and IQF are also some practices followed.
Button mushrooms are not usually dried unlike oyster, shitake or paddy mushrooms.
- Short term storage:
Mushrooms are highly perishable commodities and hence should be transferred to a cold room as soon as they are harvested.
Button mushrooms can be stored in 4-5 degrees Celsius for 3-4 days.
Button mushrooms should not be washed. But in case washing is required, a mix of 10 liters of water with 5-gram Potassium metabisulphite must be used to remove dirt.
Modified atmosphere packaging or controlled atmosphere packaging is also used in some places.
Guide to paddy straw mushroom farming in India
One of the oldest and commonly used techniques of mushroom farming is paddy straw mushroom farming. It’s an edible mushroom of the tropics and subtropics.
Andhra Pradesh, Kerala, Orissa, Tamil Nadu and west Bengal are the states producing paddy straw mushrooms in India. But since the yield (10-15% of dry substrate) of this cultivation technique is low, the overall yield from these states is also very low.
Indoor Cultivation Technology has increased the yield (35-40% biological efficiency) of paddy straw mushrooms and has brought paddy straw mushroom cultivation at semi-industrialized status.
The indoor cultivation method of paddy straw mushroom has following components and steps:
Substrate for paddy straw mushrooms
- Paddy straw
- Cotton waste is more preferable option of paddy straw.
- Since cotton waste has more cellulose and hemi-cellulose, it can retain more moisture and eliminates the need of water in later stages of cropping.
- This also helps in minimizing the risk of damaging the primordia.
Preparing the compost for paddy straw mushrooms
- The substrate such as paddy straw or cotton ginning mill waste or a mix of paddy straw and cotton ginning mill waste with a ration of 1:1 is wetted for the first 2 days.
- 5% Poultry manure is added to the pile of dimensions 1.5meter high x 1.5meter wide.
- However, nothing will be added to cotton ginning mill waste.
- The compost is turned twice in two days (1 turning each day)
- On the third turning, 1.5% calcium carbonate is added to the compost and is left for fermentation for the next 2-3 days.
Pasteurization and bedding for paddy straw mushrooms
- The compost is spread on shelves or beds after outdoor composting for almost 3-4 days.
- The thickness of the beds is dictated by the season in which the cultivation is being done. The thickness of the bed ranges from 5cm to 10cm.
- In summers less thickness of the bed is preferred.
- The compost is spread evenly and after 12 hours the compost is subjected to steam.
- A temperature of 60 degrees Celsius is maintained for 4-5 hours for cotton waste compost and a temperature of 65 degrees Celsius is maintained for almost 6 hours for paddy straw compost. This method posturizes the compost.
- The compost is then kept at a temperature of 50 degrees Celsius for the next 36 hours and then it’s allowed to cool naturally.
Spawning of paddy straw mushrooms
- The spawning process can be started when the compost cools down to a temperature of 35 degrees Celsius.
- Spawns of paddy straw mushrooms are called grain spawns as they are made of grains of cereals or millets.
- Spawns made of soaked paddy stray are called straw spawns.
- The compost is spawned with fresh spawn @ 1.5% (dry weight) or 0.4% (wet weight) basis of the compost.
- The spawns are inserted 2 to 2.5 cm deep in the compost with a spacing of 12 to 15 cm.
- The bed of compost is covered with thin plastic sheet after covering the spawns with compost.
Spawn running of paddy straw mushrooms
- A fixed temperature of 32 to 34 degrees Celsius is maintained for the spwan run.
- This temperature is ideal for colonization of the compost.
- Cotton waste compost takes 4-5 days to colonize whereas paddy straw compost takes 5-6 days for colonization.
Crop management and fructification of paddy straw mushrooms
- In the stage of spawn running, make sure there is adequate ventilation.
- Water and light are not necessary.
- After 4 days, you can add fluorescent lights in the room.
- The plastic sheets used to cover the compost in spawning step are now removed on the 5th day and water is gently sprayed over the beds.
- The pinhead starts emerging on 5-6th day of spawning.
Harvesting of paddy straw mushrooms
- The first bloom or break or flush of paddy straw mushrooms can be seen after 4 to 5 days of pinhead formation.
- Relative humidity of 80%, temperature of 30 degrees Celsius, regular fresh air and fluorescent lights can significantly increase the yield.
- Mushrooms can be harvested as early as when the volva just breaks and reveals the mushroom.
- This mushroom grows very fast and hence sometimes it is harvested twice or thrice a day.
- The first flush constitutes 70 – 90% of the total mushroom yield.
- Harvesting should be done by gently lifting, shaking and slightly twisting the mushroom from the bed.
- Reframing from cutting the mushrooms using tools while harvesting. The stalk left behind in the bed might result in infestation of pests and lead to decreased yield.
Guide to Oyster/ Dhingri mushroom farming in India
Technology used for the cultivation of the culinary and medicinal mushroom Pleurotus Spp. Often regarded as an oyster mushroom, has been standardized on locally available substrates.
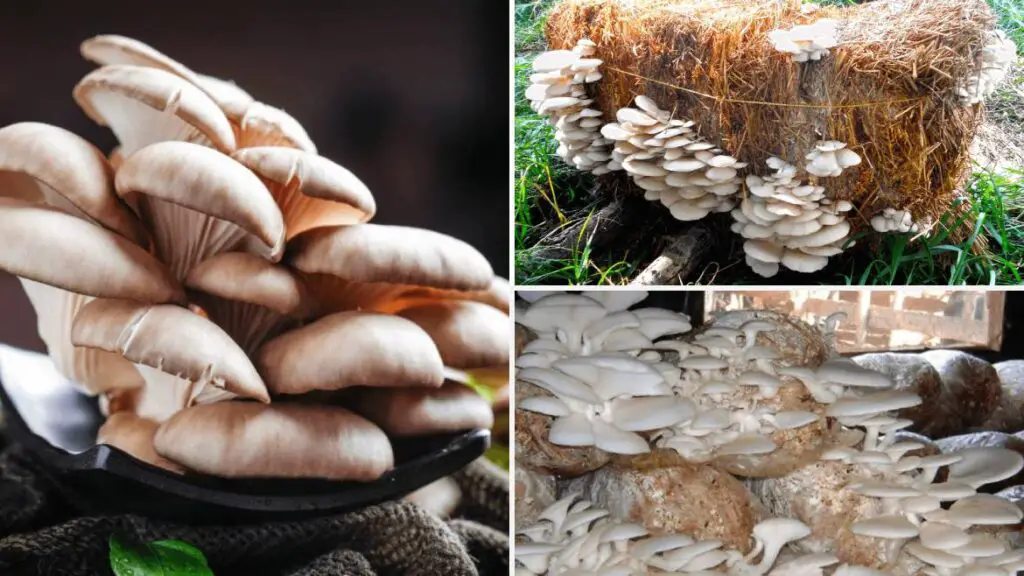
The cultivation of pink, gray, white, yellow, brown, and black oyster mushrooms is the same; there are only minor differences in the duration of spawn running and cropping.
Oyster mushrooms are easy to grow. Currently, it is very popular in many countries, particularly in South-East Asia, where cultivation of button mushrooms is not feasible under natural climatic conditions.
Substrate for oyster mushroom cultivation
- Substrate for oyster mushroom cultivation can be all kinds of cellulosic farm wastes.
- Banana pseudo stems, cotton ginning mill waste, leaves of maize, used citronella leaf, sugarcane bagasse, sawdust, jute, used tea leaf waste, synthetic compost of button mushrooms, paper mill sludges, coffee byproducts, tobacco waste, cereal straw and waste paper are some of the substrate options.
- Paddy straw is the most commonly used substrate.
Compost preparation for oyster mushroom cultivation
- The substrate is chopped into 1 to 2 cm long pieces, and soaked in water for 2 to 3 hours.
- Pasteurization of the substrate depends on the level in which farming is being done.
- Small scale production: soaked in hot water at 80 degrees Celsius for 2 hours
- Semi- commercial production: Steamed at a temperature of 80 degrees Celsius in steam chamber.
- Full-fledged commercial production: substrate is subjected to 121 degrees Celsius temperature with 15-pound op pressure for 15 minutes in an autoclave.
Spawning of oyster mushroom
- The pasteurized substrate is brought to a temperature of 65 degrees Celsius and is packed in polypropylene bags.
- The bags are plugged with non-absorbent cotton.
- The bags are filled 2/3 with the substrate and 1/3 with air.
- 40 grams of grain spawn can be mixed with 1 kg of substrate.
Spawn running of oyster mushroom
- The polypropylene bags are then put in a dark room with a temperature of 24-28 degrees Celsius for 18-30 days.
- The number of days can differ depending on the variety of the oyster mushroom being farmed.
Crop management and fructification of oyster mushroom
- After the designated number of days, the bags are then moved to a cropping room.
- Holes are made on the polypropylene bag. The holes can be of 2 cm in diameter with a spacing of 4 cm.
- Pinhead will start emerging from the openings within 2 to 7 days depending on the variety.
- The adequate temperature ranges from 13-30 degrees Celsius and relative humidity ranges from 80 to 85%, depending on the variety of the oyster mushroom.
- In almost 2 weeks the substrate inside the bags become compact. At this point you can cut the bags and place the compact substrates on shelves.
Harvesting of oyster mushroom
- Harvestable crop will appear in almost 3 weeks.
- The compact substrate cylinders now have a growth of oyster mushrooms on the outside.
- The best time to harvest the oyster mushrooms is when the cap starts folding.
- The fist flush can appear in 18-20 days and the subsequent second and third flush can appear in an interval of 7 days.
- You can cut the oyster mushrooms with a tool or pluck it from the substrate gently by twisting.
Guide to Milky mushroom farming in India
Milky mushrooms are named so because they are milky white in colour. It is the only species of mushroom that is indigenous to, and cultivated in, the hot, moist climate of India.

It is also known as “Swetha” mushroom or “summer” mushroom. It’s a tropical mushroom which can grow to be quite long and thick.
Karnataka, Tamil Nadu, Kerala, Odisha and Andhra Pradesh are the states in India having suitable climatic conditions to growth of milky mushrooms.
Substrate for milky mushrooms
- Banana pseudo stems, cotton ginning mill waste, leaves of maize, used citronella leaf, sugarcane bagasse, sawdust, jute, used tea leaf waste, synthetic compost of button mushrooms, paper mill sludges, coffee byproducts, tobacco waste, cereal straw and waste paper are some of the substrate options.
- Paddy straw is the most commonly used substrate.
Compost preparation for milky mushrooms
- Substrate can be chopped in size of 4 to 5 cm or 1 to 2 cm.
- Substrate is soaked in clean water for almost 6 hours.
- Pasteurization of the substrate depends on the level in which farming is being done.
- Small scale production: soaked in hot water at 80 degrees Celsius for 2 hours
- Semi- commercial production: Steamed at a temperature of 80 degrees Celsius in steam chamber.
- Full-fledged commercial production: substrate is subjected to 121 degrees Celsius temperature with 15-pound op pressure for 15 minutes in an autoclave.
- At the end of this process the moisture content of substrate should be around 60%.
Spawning of milky mushroom
- The substrate is kept in Polythene tube of dimensions 60 cm x 40 cm and a thickness of 100 gauge.
- Organic supplements like wheat bran, paddy husk, maize meal or boiled wheat grain can also be added per bag. 100 grams per bag should be enough.
- The substrate in put in the tubing to a height of 7.5 cm and 35 grams of spawn is mixed with the substrate.
- Three such layers are made and the bag is closed with an insulating material like cotton.
- The bag is lined with holes of 1 cm diameter for gas exchange. 20 such holes per bag are enough.
Spawn running of milky mushrooms
- The bags incubated in a dark room with temperature of 30 to 38 degree Celsius and relative humidity of 80%.
- The bags are kept in a dark room for 25-30 days.
Casing of milky mushrooms
- Red soil or a mixture of red soil and Decomposed coir compost (1:1 ratio) is a good casing material for milky mushrooms cultivation bags.
- The pH of the casing soil should be around 8.
- The thickness of the casing is 2-3 cm.
- Make sure to posturize the casing soil with chalk powder and kept in 15 psi in autoclave for few hours.
- Posturizing the casing soil can also be done with 4 % formaldehyde a week before it is applied to the bags.
- Proper turning of the casing soil is done regularly to eliminate most of the traces of formalin.
- For casing of the bags, the bags are open and a uniform layer of casing material is allied to the substrate with the spawn.
Crop management and fructification of milky mushroom
- After almost 10 days, the mycelium will penetrate the casing layer.
- As the pinheads start appearing, the bags are moved to cropping room with a temperature of 30 to 38 degrees Celsius and relative humidity of 80 to 85%.
- The room should have adequate light and ventilation as well.
Harvesting of milky mushroom
- When the milky mushrooms grow to a diameter of 8 to 10 cm, the crop is harvested.
- The milky mushrooms are harvested by twisting gently from the base.
- By using this cultivation method, a 6-week crop can yield almost 1 kg of mushrooms per bag.
Guide to Shiitake mushroom farming in India
Shiitake mushroom, an edible and medicinal mushroom can be easily grown for commercial purposes.
It is not only a good source of protein and vitamin B, but its zero fat and sugar content make it a very good option for diabetics and heart patients.
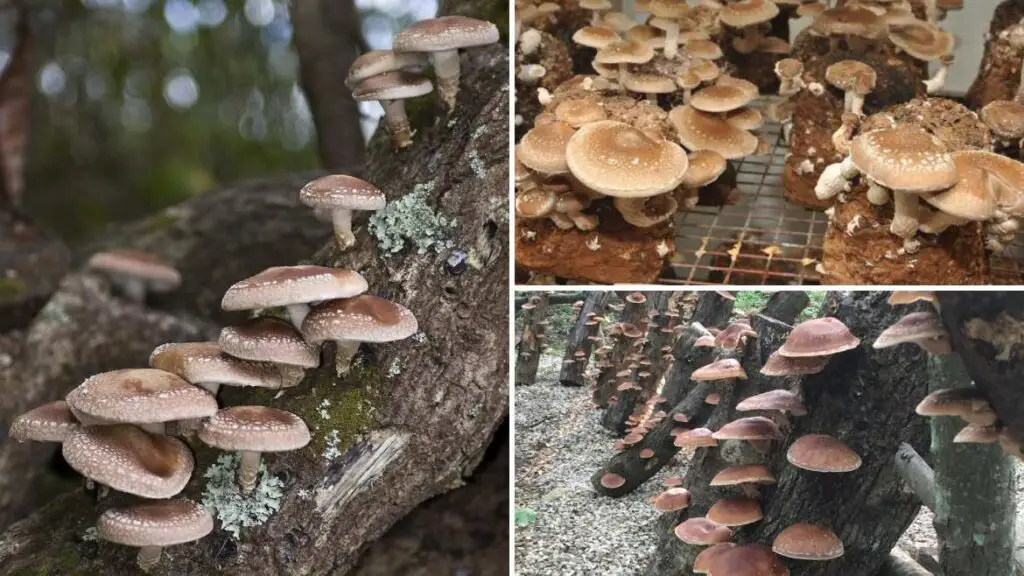
Lentinan, a compound extracted from these mushrooms, is also used in manufacturing of a drug for cancer.
It can be cultivated in hardwood sawdust of teakwood, Sal and Indian Kino tree.
Substrate for Shiitake mushrooms
- Rice bran, wheat bran, wood chips, hard wood sawdust, eucalyptus sawdust, teakwood saw dust, and calcium sulphate are some of the substrate options.
- Saw dust should not be a fine powder, as water logging with reduce the speed of growth of mycelium.
- A very coarse saw dust is also not recommended as it is hard to pack in bags and your compost will contain too much air.
- A mix of coarse and fine sawdust is generally preferred.
Compost preparation for Shiitake mushrooms
- Sawdust is wetted for few hours.
- The substrate should not be wetted heavily. A good hydration test is squeezing the substrate in your hand as tightly as possible and only few drops of water should drip.
- If there are dry patches, add little bit of water.
- Good hydrated substrate ratio examples can be a mix of 1kg of sawdust, 250g of wheat/rice bran and 1.6 L of water OR 1Kg of sawdust and 1.5L of water OR 1Kg of wheat/rice bran with 0.5 L of water.
- Pasteurization of the substrate can be done by subjecting it to 121 degrees Celsius temperature with 15-pound op pressure for 120 minutes in an autoclave.
- At the end of this process the moisture content of substrate should be around 65%.
Spawning of Shiitake mushroom
- The substrate is kept in Polypropylene bags.
- 1 Kg of substrate is mixed with 40 grams of spawning material.
- Unlike other bag mushroom farming methods, no holes for ventilation are required in this case.
Spawn running of Shiitake mushrooms
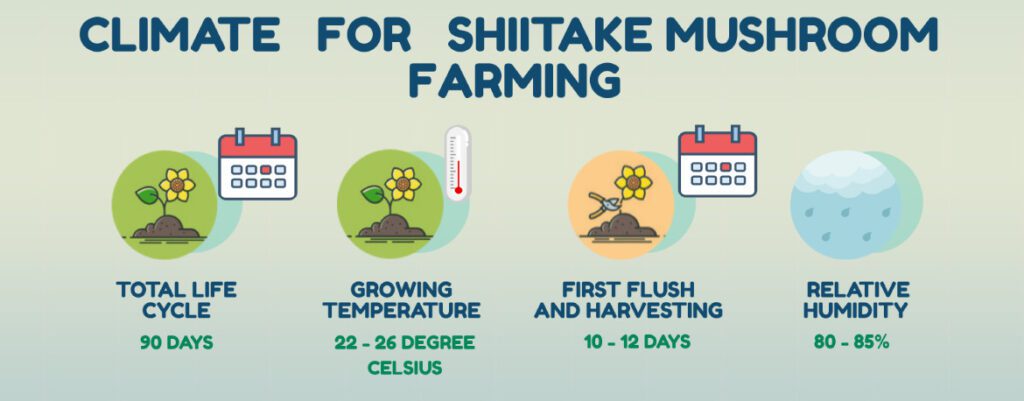
- The bags incubated in a dark room with temperature of 22 to 26 degree Celsius.
- The bags are kept in a dark room for 60-70 days.
- Mycelial coat formation (a white substance) will start followed by the formation of blisters.
Crop management and fructification of Shiitake mushroom
- Typically, Shiitake mushrooms take 8-12 weeks to colonize.
- When the substrate turns completely brown, remove the Polypropylene bag. And moved to a cropping room.
- The brown blocks are now shock treated with spraying cold water with a temperature of 10 to 15 degrees Celsius.
- After 10-12 days of shock treatment, the shiitake mushrooms are ready to harvest. but this also depends on how cold is the weather.
- As the pinheads start appearing in the cropping room with a temperature of 22 to 26 degrees Celsius and relative humidity of 80 to 85%.
- The room should have adequate light and cross ventilation as well.
Harvesting of Shiitake mushroom
- When the milky mushrooms grow to a diameter of 3 to 6 inches, the crop is harvested.
- The milky mushrooms are harvested by twisting gently from the base.
- Harvest the Shiitake mushrooms when the gills underneath the mushrooms are visible and the outer edge is slightly curved.
- If the edge of the mushroom is flat, then the mushroom is over ripped. It is still edible though.
- Don’t wash the mushrooms after harvesting.
- Immediately refrigerate the mushrooms within 1 hour of harvesting.
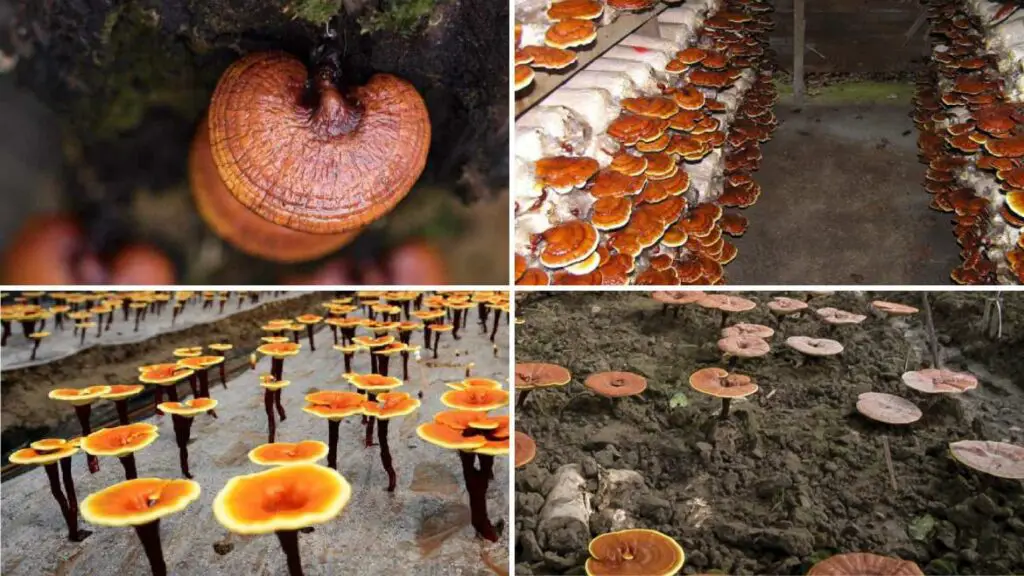
Guide to Reishi mushroom farming in India
Reishi mushroom is mostly cultivated because of its pharmacological importance. Global trade of this mushroom has crossed more than 2 billion dollars. This makes this mushroom as good candidate for cultivation commercially.
It is considered as almost a panacea in few cultures like Japanese and Chinese. It is believed to have medicinal characteristics such as anticancer, antioxidants, hypoglycemic, anti-HIV, anti-heart attack, cholesterol lowering as well as anti-angiogenic.
Since this mushroom is grown exclusively for medicinal purposes, its farming should be done organically.
It can be grown in poly-houses and also in the environmentally-controlled cropping rooms.
These mushrooms are typically naturally found in dead or dying hardwood in warmer temperatures in the month of May to November.
Substrate for Reishi mushrooms
- Organically supplemented hardwood saw dust like eucalyptus tree saw dust or teak wood saw dust.
- Saw dust of broad leaves trees like coconut, Sheesham and mango is also preferable.
- Saw dust should not be a fine powder, as water logging with reduce the speed of growth of mycelium.
- A very coarse saw dust is also not recommended as it is hard to pack in bags and your compost will contain too much air.
- A mix of coarse and fine sawdust is generally preferred.
Compost preparation for Reishi mushrooms
- Saw dust is mixed with 20% of wheat/rice bran.
- Sawdust is wetted for few hours.
- The substrate should not be wetted heavily. A good hydration test is squeezing the substrate in your hand as tightly as possible and only few drops of water should drip.
- If there are dry patches, add little bit of water.
- The desired pH level of 5.5 is obtained by adding calcium carbonate (chalk powder) and calcium sulphate (gypsum).
- Pasteurization of the substrate can be done by subjecting it to 121 degrees Celsius temperature with 15-pound op pressure for 120 minutes in an autoclave.
- At the end of this process the moisture content of substrate should be around 65%.
Spawning of Reishi mushroom
- The substrate is kept in Polypropylene bags with the mouth of the bag sealed with a non-adsorbent material like cotton.
- Sterilization of the bags is done in autoclave for 2 hours under a pressure of 22 PSI.
- The substrate in the bag is spawned with wheat grain or saw dust spawn at the rate of 3% of the total dry weight.
Spawn running of Reishi mushrooms
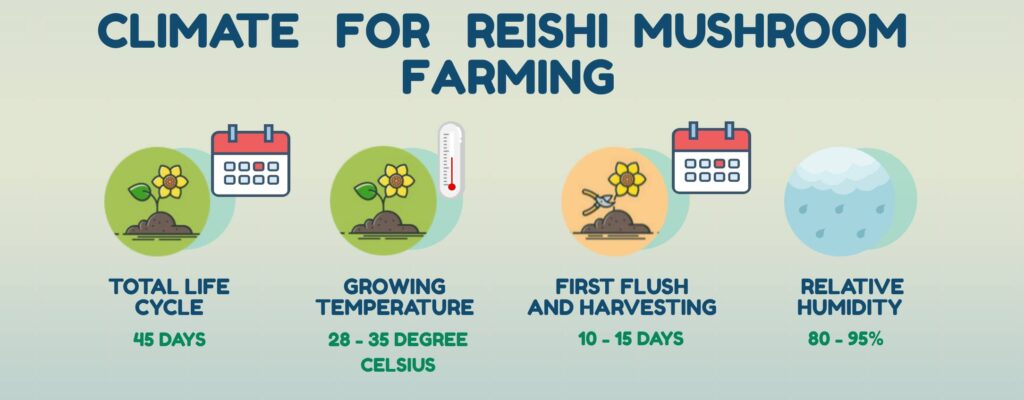
- The bags incubated in a closed dark room with temperature of 28 to 35 degree Celsius.
- The level of carbon dioxide is kept high in the incubation room.
- The bags are kept in a dark room for almost 25 days.
Crop management and fructification of Reishi mushroom
- After 25-30 days of incubation, the top part of the Polypropylene bag is cut off at the level of top part of the substrate.
- Fruiting and pinning will start happening at this point .
- The adequate environmental conditions like temperature of 28 degree Celsius, 800 lux light, 95% relative humidity and 1500 ppm carbon dioxide, are provided to the bags.
- Humidity is reduced to 80% once the pins have started growing flatter whitish tops.
- Now is the time when fresh air is also introduced to reduce the carbon dioxide levels to 1000 ppm.
- When the caps become yellowish in colour, the temperature is lowered further to 25 degrees Celsius along with further reduction in relative humidity to 60%.
Harvesting of Reishi mushroom
- Fully matured Reishi mushrooms have a reddish-brown top.
- The Reishi mushrooms are harvested by two hands. One hand is used to tightly hold the root and the other hand can be used to pulling the Reishi mushroom out.
- Harvest the Reishi mushrooms can also be done with cutting tools but it should be made sure that no residual steam is left on the compost log.
- The first flush of Reishi mushrooms can be seen in almost 2 weeks.
- After harvesting the first flush, again the environment of the room or polyhouse should be switched back to adequate environment for pinning. (i.e., 28 °C, 95%RH, 1500 ppm CO2, 800 lux light)
- 250 grams of Reishi mushrooms can be cultivated from 1 kg of substrate on an average.
- Mushrooms are washed with water after harvesting.
- After washing, Reishi mushrooms must be dried in temperatures lower than 50 degrees Celsius. A temperature of 35 degrees Celsius in drier cabinet is advisable.
Diseases and preventive measures in Mushroom cultivation
Some of the diseases of mushrooms are listed below:
| MUSHROOM DISEASES | SYMPTOMS | CONTROL AND PREVENTION |
|---|---|---|
| Mushroom flies | These flies are small, delicate, black, yellowish or sometimes brown with different types of wing venation and size. | Spring is inside the wall of the mushroom house. The insecticide should be added in the last turning of the compost. |
| Mites | They are small in size and are Majorly white, yellow, red and brown. They can be found running over the surface of the fruit bodies, mushroom beds and on the floors and walls of the mushroom houses. The damage the crop by feeding on the spawn to make holes in the mushroom caps and stalks and cause stunting of fruit bodies as well as brown spots on the caps and stems. | Proper pasteurization of compost. Proper hygiene and sanitation. Disinfection of the mushroom houses by spraying 0.1% dicofol. Burning sulphur in the empty room. |
| Springtails | They are silver-grey 2 brown colours with a light violet band along the sides of the body and black cellular fields present on the head. They are the main species that damage mushrooms. They enter mushroom houses along with organic matter. They feed on mycelium from spawn. They also feed on the gills of the oyster mushroom destroying the lining and spit out the mycelial strands at the base of the stripes. They also attack the fruiting bodies of button mushrooms and cause slight pitting and browning at feeding sites. | Cleaning surrounding and inside of the mushroom house. Proper disposal of spent compost. Proper pasteurization of composed and casing material. Raising the crop above the floor level. |
| Brown plaster mould | Occurs on the cropping trees, initially cloudy white appearance later changes to brown. Originally fungus rises in compost. too wet compost, high temp. (28-32) c during spawn run and cropping at more than 18 C encourages Infection. | Maintain suitable temp. during the spawn run and cropping 2% of formalin |
| Bubble disease: – C.O.: Mycogone perniciosa | Dense white mat of mycelium leading to reduction in yield. Swollen stalk and smaller cap at early stage. Unpasteurized compost also leads to it. An amber liquid appears on infected mushrooms. Mushrooms become brown. Bubbles may be as large as a grapefruit. It is also a parasite of wild mushrooms. It produces two spore types, one which is small and water-dispersed like Verticillium. the second which is a large resting spore capable of persisting for a long time in the environment. | Beds sterilised @ 2% formalin. Spray dithane Z-78 @ 0.2 % and benlate @ 0.05%. |
| Dry bubble, brown spot disease: – C.O.: Verticillium malthousei or V. psialliste | Causes brown spot-on cap, resulting in irregular patches In severe infection mushroom become distorted. Affected mushrooms becomes leathery | Dithane Z-78 @ 0.2% 3 times at casing. Control of high temperature at casing and proper ventilation . |
| Bacterial disease:- Bacterial blotchC.O.: Pseudomonas tolaassi | Appearance of brown slightly sunken blotches on the mushroom cap Spots are irregular, yellowish to dark brown. Main source of infection is infection soil and separate through flies, mites and nematodes. | Casing soil sterilization and proper ventilation . Use of chlorinated water. Spray of terramycin @ 9mg/f on beds. |
Types of Mushrooms
Based on the purpose of this article, we can categorize types of Mushrooms in the following two categories.
Based on Scientific name (Genus, Species and Common name)
| GENUS | SPECIES | COMMON NAME |
|---|---|---|
| Agaricus | arvensis | Horse Mushroom |
| augustus | The prince | |
| bernardii | ||
| bisporus | Common store mushroom | |
| brunnescens | button mushroom | |
| commercial mushroom | ||
| bitorquis | Spring agaricus | |
| rodmanii | ||
| campestris | Field or meadow mushroom | |
| crocodilinus | Crocodile agaricus | |
| fuscofibrillosus | Bleeding agaricus | |
| haemorrhoidarius | Bleeding agaricus | |
| Amanita | phalloides | Death cap |
| Armillaria | matsutake | Matsutake |
| mellea | Honey or oak mushroom | |
| ponderosa | American matsutake or pine mushroom, | |
| recently renamed Tricholoma magnivelare | ||
| Auricularia | auricula | Cloud ear mushroom or Judas' ear |
| polytricha | Wood ear mushroom, | |
| tree ear, or black fungus | ||
| Boletus | aereus | |
| appendiculatus | Butter bolete | |
| badius | Bay bolete | |
| barrowsii | Barrow's bolete | |
| bicolor | Two-colored bolete | |
| edulis | Porcini, cèpe, or king bolete | |
| mirabilis | Admirable bolete | |
| pinicola | Variant of B. edulis | |
| regius | Regal bolete | |
| zelleri | Zeller's bolete | |
| Bovista | various | Puffball |
| Calbovista | various | Puffball |
| Calvatia | gigantea | Puffball |
| Cantharellus | cibarius | Golden chanterelle or egg mushroom |
| cinnabarinus | Cinnabar-red chanterelle | |
| lateritius | Smooth chanterelle | |
| subalbidus | White chanterelle | |
| tubaeformis | Trumpet chanterelle | |
| Chlorophyllum | molybdites | Green-spored parasol mushroom |
| morgani | ||
| Clitocybe | fragrans | Fragrant clitocybe |
| odora | Anise-scented | |
| nuda | Blewit | |
| Clitopilus | prunulus | Sweetbread mushroom |
| Coprinus | atramentarius | Alcohol inky cap |
| comatus | Shaggy mane, lawyer's wig, or inky cap | |
| micaceus | Mica cap | |
| Cortinarius | armillatus | Bracelet cortinarius |
| Craterellus | cornucopioides | Horn of plenty, trumpet of death, |
| or black chanterelle | ||
| Entoloma | abortivum | Aborted entoloma |
| Flammulina | velutipes | Enoki, velvet foot, golden needle, |
| or winter mushroom | ||
| Gomphus | clavatus | Pig's ear |
| Grifola | frondosa | Hen of the woods |
| Polypilus | ||
| Gyromitra | gigas | Snowbank false morel |
| Helvella | lacunosa | Black saddle mushroom |
| Hericium | coralloides | Coral hericium |
| caput ursi | ||
| americanum | ||
| erinaceus | Bear's head, monkey head, or pom-pom | |
| ramosum | Comb tooth mushroom | |
| Hydnum | repandum | Hedgehog mushroom or sweet tooth |
| umbilicatum | Belly-button mushroom | |
| Hygrophorus | russula | Russula like waxy cap |
| Lactarius | deliciosus | Delicious milky cap |
| fragilis | Candy cap | |
| indigo | Blue milky cap | |
| rubrilacteus | Bleeding milky cap | |
| Leccinum | aurantiacum | Orange-capped scaber stalk |
| insigne | Aspen scaber stalk | |
| manzanitae | Manzanita scaber stalk | |
| scaber | Scaber stalk | |
| Lentinus | edodes | Shiitake, black forest mushroom |
| Lepiota | molybdites | Green-spored parasol |
| Chlorophyllum | ||
| Lepiota | procera | Parasol mushroom |
| rhacodes | Shaggy parasol mushroom | |
| or drumstick mushroom | ||
| Lepista | nuda | Blewit |
| Clitocybe | ||
| Lycoperdon | various | Puffball |
| Marasmius | oreades | Fairy-ring mushroom |
| scorodonius | Garlic marasmius | |
| Morchella | angusticeps | Morel or sponge |
| conica | Morel or sponge | |
| deliciosa | Morel or sponge | |
| esculenta | Morel or sponge | |
| Phlogiotis | helvelloides | Apricot jelly mushroom |
| Pholiota | nameko | Nameko |
| aurivella | Butter mushroom | |
| Pleurocybella | porrigens | Angels' wings |
| Pleurotus | ostreatus | Oyster mushroom |
| sajor-caju | Oyster mushroom | |
| Pluteus | cervinus | Fawn mushroom |
| Polypilus | frondosa | Hen of the woods |
| Grifola | ||
| Polyozellus | multiplex | Clustered blue chanterelle |
| Polyporus | umbellatus | Umbrella polypore |
| Ramaria | botrytis | Red-tipped coral mushroom |
| Rozites | caperata | Gypsy mushroom or chicken of the woods |
| Russula | aeruginea | Tacky green russula |
| cyanoxantha | Charcoal burner | |
| delica | Short-stem russula | |
| nigricans | Blackening russula | |
| vesca | Bare-toothed russula | |
| xerampelina | Shellfish-scented russula | |
| Sparassis | crispa | Cauliflower mushroom |
| radicata | ||
| Strobilomyces | confusus | Old man of the woods |
| floccopus | ||
| Stropharia | rugosoannulata | Wine-cap stropharia |
| Suillus | brevipes | Short-stalked slippery cap |
| granulatus | Dotted-stalk suillus | |
| pictus | Painted suillus | |
| Terfezia | bouderi | Black kame |
| claveryi | Brown kame | |
| Tremella | fuciformis | Snow mushroom, white jelly fungus, |
| or silver ear mushroom | ||
| Tricholoma | flavovirens | Man on horseback |
| equestre | ||
| magnivelare | Pine mushroom or American matsutake | |
| Tuber | aestivum | Summer truffle |
| gibbosum | Oregon white truffle | |
| magnatum | Italian white truffle | |
| melanosporum | French black truffle | |
| texensis | Texas white truffle | |
| Volvariella | volvacea | Straw mushroom or paddy straw mushroom |
Based on local Indian Mushroom variety (Cultivated in India for edible and medicinal purposes)
- Agaricus Bisporus
- Pleurotus Sajor-caju
- Volcvariella Volvacea
- Calocybe Indica
- Pleurotus Ostreatus
- Auricularia Spp.
- Pleurotus Florida
- Lentinula Edodes
- Pleurotus Djamor
- Ganoderma Lucidum
- Pleurotus Eryngii
- Hypsizygus Tessulatus
Final words
Mushroom farming in India has seen a considerable growth worldwide. Its not only being farmed for dietary consumption but also for medicinal purposes. One of the most attractive aspect of doing mushroom farming is, its still very lucrative even if done in a small scale.
Mushroom farming in India presents itself as a very good business idea for not only budding entrepreneurs / farmers but also veterans of agriculture.
I hope this article was able to answer many of your questions. Please feel free to comment your thoughts. Any suggestion or advise will be highly appreciated. Also, kindly do post any questions which are still unanswered. I would be happy to assist. Please feel free to share the article with anyone who you think is in need of assistance in gaining information on mushroom farming / mushroom cultivation.
